Out of more than one hundred flowering species of Curcuma (turmeric), Curcuma australasica is the only native turmeric plant, making it a special addition to any serious native garden collection. Its bright yellow roots are edible and have tons of potential medicinal uses too, and unlike other members of the ginger family, it is exceptionally easy to grow and store.
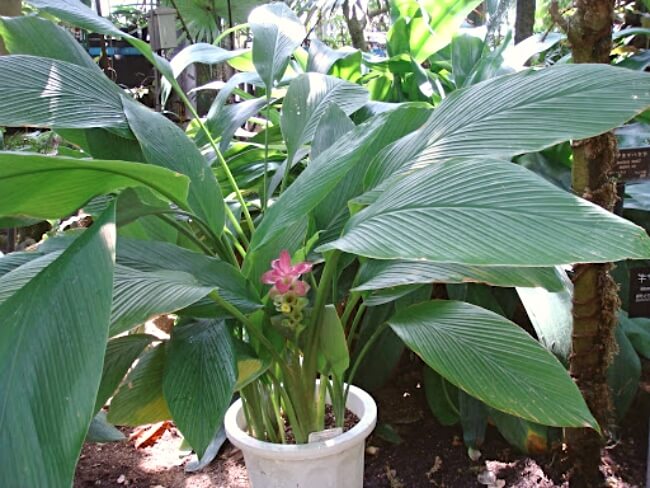
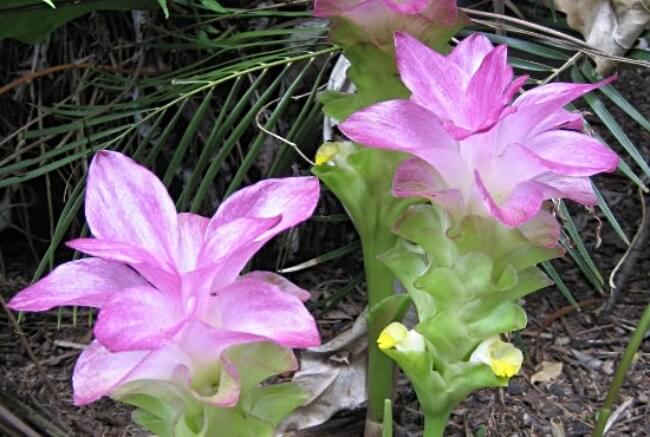
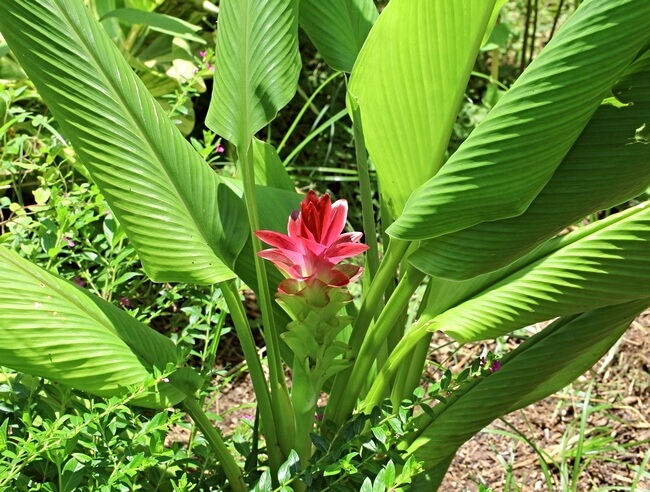
Its long-lasting pinkish mauve bracts and bright yellow flowers will compliment even the most ornamental border, and if you’re lucky enough, you may come across a rare white specimen in the wild.
We’ve been growing these incredible rhizomes for years because they are one of the most wonderful edible bush tucker plants we can cultivate. So, here’s our guide to growing and caring for them properly, but first, a little bit of background about Australian native turmeric.
More...
Source: World Tropical Flowers
Family: | Zingiberaceae |
|---|---|
Genus: | Curcuma |
Species: | C. australasica |
Common names: | Native Turmeric, Cape York Lily, Hidden Ginger, Hidden Lily, Native Turmeric, Wild Turmeric |
Origin: | Australia |
Location: | Outdoor |
Type: | Herbaceous Perennial |
Growth: | 50cm tall, spreads to 1m across |
Sun requirements: | Part shade preferred |
Foliage colour: | Green |
Flower colour: | Pink or white |
Flowering: | November-March in Queensland |
Edible parts: | Root/Rhizome |
Maintenance level: | Low |
Poisonous for pets: | Safe for pets |
What is Curcuma australasica?
Curcuma australasica is native Australian turmeric. It is an herbaceous perennial that forms a rhizomatous root and is used in cooking just like its relative Curcuma longa (turmeric) which is more widely used and generally more readily available.
It carries many common names as it is in the Zingiberaceae family along with ginger. Despite some very vivid flavour differences, the two are closely related. Also known as the Cape York Lily, this plant can grow up to a metre in height but is usually around 50cm tall.
Just one commonly grown cultivar exists; Curcuma ‘Aussie Plume’, which grows best in slightly cooler conditions, but can reach up to 1.5m tall, with a striking white and pink-tipped flower.
Cape York Lily’s Natural Habitat
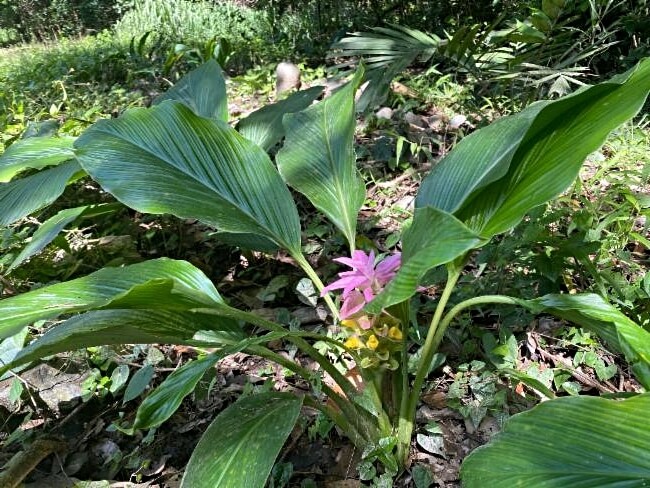
Native turmeric is found growing in most parts of Australia, but most prolifically in Queensland, on the Cape York Peninsula - hence its common name the Cape York Lily. They thrive in moist conditions such as forest and wet woodlands often showing their flowers first before most leaves emerge.
The leaves are vast compared to the flowers, and distinctly ribbed, like many tropical woodland flowers, which use their large spreading leaves to catch as much water as possible, which is then directed towards the rhizome, storing water for later, and helping to reduce the risk of problems like root rot that typically harm fibrous roots in forest and woodland conditions.
In gardens, they can be grown in part shade or full sun but they develop best, particularly for harvest, if grown in part sun with dappled afternoon sun and plenty of water.
Common Uses for Curcuma australasica
Besides its ornamental uses in garden design, Curcuma is known for its medicinal properties. All health-conscious people are aware of the benefits of turmeric. It has proven its worth with its anti-inflammatory and antioxidant properties and become a staple ingredient in many countries' cultural cuisines.
Turmeric has been used in the management of chronic pain and inflammation and is generally considered to be an overall health supplement for general wellness, supporting everything from healthy blood pressure to muscle healing.
Its warm and earthy flavour makes it a useful ingredient in curries, stews and casseroles, but it can also turn its hand to sweet recipients too, such as spiced cakes and biscuits.
Native Australian aboriginals within Cape York Peninsula, where the crop is abundant, roast the whole root.

Get Your Free Guide:
Master Growing Australian Natives eBook
A Must Have Complete Guide for Every Australian Garden
Get Your Free Guide:
Master Growing Australian Natives eBook
A Must Have Complete Guide for Every Australian Garden
Australian turmeric can also be used as a yellow food dye once dried, dehydrated and crushed to a fine powder. Similar to its relative, turmeric, which is more commonly used for a darker colour.
How to Grow Curcuma australasica
This guide to growing native turmeric digs into the details of soil types, water requirements and even the conditions required for optimum germination of turmeric seeds (though, as we’ll look at later, they are far more reliably grown from rhizome root cuttings and division).
Source: Atlas of Living Australia
Ideal Conditions for Growing for Australian turmeric
Native turmeric grows in moist shaded conditions in nature, dappled in warm sunlight by the overhead canopy. Creating this sort of layered planting in your garden isn’t simple, but it's far from impossible and can help to add texture and depth to gardens of all sizes.
Soil & Drainage
Curcuma australasica loves soil rich in humus and organic matter with a slightly acidic pH. Essentially, you’re trying to create forest floor conditions, with a layer of topsoil built almost entirely from fallen leaves and decaying organic matter.
It would also be suited to streamside gardens or a well-oxygenated bog garden on the edge of a natural pond. Avoid any boggy conditions that are slow draining, or where water stagnates, as native turmeric will suffer without well-oxygenated water.
Put simply, if you’ve got a healthy pond, it will grow well on the edge. If you’ve got a muddy puddle, it won’t.
Australian native turmeric is adapted to monsoonal conditions so wants to be well watered in its growing season, but during its dormant months when the foliage dies back, it prefers to be dry.
Light & Temperature
Curcuma australasica prefers a sunny position but will grow in light shade.
Whilst not technically frost-hardy, mature native turmeric is really quite tolerant to cold and can survive short periods of cold. Growing in cooler regions of Australia, native turmeric will be happier in a greenhouse or with some sheltered protection when harsh weather arrives (horticultural fleece is ideal for any sudden unexpected frosts).
This turmeric may not produce a flower spike in the first year or two if growing in a cooler region.
Planting Native Turmeric
Plant turmeric rhizomes about 5cm deep. The buds will naturally form in multiple places along each rhizome. Most guides suggest spacing buds 90cm apart, but it is best to keep rhizomes intact and separate them later.
Like many others in the ginger family, native turmeric will happily grow in pots. Container-grown Curcuma can be much more successful in cooler regions as they are easier to move and shelter in harsh weather.
The best time to plant native turmeric rhizomes is early spring, but they can be planted at any time of year provided the soil remains reasonably dry or drained until the first buds develop.
How to Propagate Curcuma australasica
Curcuma australasica can easily be propagated by division which is the best way to create more plants. A good candidate for a healthy rhizome would be a piece that has several healthy buds or fingers.
Signs of a healthy rhizome, ready for planting are an overall firm and dry feel, with small protruding buds. Being an herbaceous perennial, Curcuma does benefit from being lifted and divided, optimally every 5 years or so to reinvigorate the rhizomes and keep the footprint of the plant from hollowing in the centre.
Curcuma australasica Propagation from Seeds
It is possible to grow turmeric from seed, however, the seed is rare to find and if obtained unreliable to germinate, so its main form of propagation is from rhizomes which are readily available.
If you manage to pollinate native turmeric or find seeds for sale, the seeds can be germinated in nearly all moist soils, though they prefer a slightly acidic leaf mould for germination.
Seeds require warm, humid conditions for germination but should not be left in full direct sunlight. Sow seeds onto the surface of leaf mould or peat-free compost in seed trays. Water them well, and then cover them with a sheet of perspex.
Leave them somewhere over 18°C and mist occasionally. Remove coverings once shoots appear.
Propagating Australian Turmeric from Rhizomes
Preparing a rhizome from a larger rhizome for cutting material is simple, and another successful way of increasing plant stock.
The rhizome itself can be cut into pieces that include at least two buds or sections to ensure it will have the ‘eyes’ that will produce new leaves. Turmeric rhizomes will have noticeable eyes just like potatoes when they chit.
Each bud should have about 1-3 inches of rhizome attached. Nicking out other buds will damage them, and focus energy on the main bud, but you will need to leave it out of the soil for any nicked buds to dry out before planting.
Caring for Curcuma australasica
Established native Turmeric is exceptionally simple to care for, but does require occasional feeding and mulch. For larger flowers and more dramatic foliage, regular seaweed feeds or balanced native plant fertilisers make a wonderful supplement to regular summer watering.
Perhaps the most important tip though is to be prepared to move these plants around the garden. Ours are quite temperamental, with young plants and divided turmeric much preferring to grow in well-watered full sun.
While mature plants are very fussy about dappled shade, flowering far more dramatically with a rich monthly liquid feed in a warm shaded spot.
Source: Witjuti Grub Bushfood Nursery
Mulching and Feeding Native Turmeric
Applying regular mulch to your Curcuma australasica will prevent any moisture in the soil from evaporating, helping to maintain ideal conditions through summer. Apply a good mulch of garden compost or leaf mould to native turmeric planted in the ground or pots in early spring.
Avoid mulching over winter, which can lead to overly damp soil. In limited spaces or tightly planted containers, balanced fertilisers can be applied during the growing season in place of mulches.
Pruning Needs
Pruning dead, diseased, or damaged leaves should be undertaken first and foremost. Besides this, native Australian turmeric does not usually need much pruning and will die back to the ground each winter.
As a rhizomatous plant it will spread slowly through garden borders, so will need to be divided every few years to prevent it from spreading out and hogging the borders.
Repotting Curcuma australasica
Just like ginger, repot turmeric when it’s asking for it. Each plant should have around 30cm of soil to itself. Three turmeric plants from one joined rhizome can grow in a 30cm pot with good compost and fertilisers, but beyond that, they will need dividing and replanting to maintain their health.
Native Turmeric Bush Tucker Guide
If you’re growing native turmeric to harvest the rhizome, allow a year or two for the plant to develop to maturity. The first flowering of Curcuma australasica will be a sure sign that it has developed a good rhizome, but giving more time will ensure a further underground supply for future use.
It is a perennial crop in that sense, but like Jerusalem artichokes or rhubarb, you always want to leave at least one-third of the plant behind when harvesting. That gives plenty to regenerate next season and will guarantee next year’s crop.
It can be harvested after the foliage has died back and yellowed, by trimming the foliage back and uprooting the outer rhizome leaving the main plant to reestablish.
How to Store Native Turmeric
Once harvested, leave the root to dry out for a few days on a windowsill, then brush off any loose dry soil. To store turmeric for culinary use, place the whole root somewhere dark and dry, with any other roots stored separately with paper bags around each so that they don’t touch.
Like apples, if one goes bad it can spoil the other roots. They should keep for around 6 months.
To store native turmeric for planting the following year – while it is much easier to store in the ground or pots – the roots can be stored in a dark cool and dry space. Preferably surrounded with a desiccant such as vermiculite or sawdust to keep the humidity stable, with an occasional misting.
Common Cape York Lily Pests and Diseases
Curcuma australasica is susceptible to normal pest damage such as caterpillars, ants and grasshoppers, but never usually to the detriment of the plant’s overall health. Emerging new leaves can have slug and snail damage, and also occasional mealy bug infestations.
All can be dealt with using organic pesticides like neem oil, but avoid using them during the day for outdoor plants when bees are most active, especially while your Cape York Lily is flowering.
Disease-wise, Curcuma of all species can develop root rot if left in waterlogged soil that doesn’t drain. Evidence of root rot will be browning leaves and leaf loss, often paired with mushy bases to the leaves.
Different root funguses will cause different signs, but inspecting the rhizome will give the clearest indication of root issues. At the end of the growing period, check for browning flesh inside the root and remove any damaged sections.
If you act quickly to remove damaged sections of root and allow the good root to callous over before replanting, it will usually regrow without issue.
Curcuma australasica Frequently Asked Questions
Source: Rob's plants
Is Curcuma australasica safe to eat?
Curcuma australasica is safe to eat. It is the native and naturally occurring cousin of turmeric, packed with vitamin C, and countless anti-inflammatory, and antioxidant compounds. It is not as strong as the commercially grown turmeric, but has the same general flavour, and can be roasted whole.
Does Curcuma australasica come back every year?
Curcuma australasica is a native herbaceous perennial. It will die back to the ground each year and continue to re-grow year after year, regenerating from the rhizome with new buds, and spreading slowly to create new plants.
Does Curcuma australasica like sun or shade?
Curcuma australasica prefers dappled shade in bright, warm conditions, but will do ok in full sun, particularly younger plants, which seem to enjoy brighter conditions than more mature turmeric plants.
Can I eat raw Curcuma australasica?
Curcuma australasica is edible raw or cooked. It can be dried and ground into a powder for storage, or stored as a whole dry root, chopped or grated into sauces. It is also possible to shave the root over salads for an earthy spice.
Do you deadhead Curcuma australasica?
Curcuma australasica does not need deadheading but it will help to improve the look of the garden as they don’t die back well, leaving plenty of browning petals after flowering. Deadheading won’t encourage new flowers.
How to overwinter Curcuma australasica?
Curcuma australasica should be overwintered in managed humidity, and surrounded by vermiculite or sawdust to retain some humidity but prevent the root from rotting. The surrounding materials will also help to regulate temperature and block out light during storage.
Add a Native Allure to Your Garden with Curcuma australasica
Curcuma australasica is a hidden gem amongst our native flora. Along with its unusual ornamental flowers, its lush arching leaves form a tropical dreamscape that litters woodland floors and gardens alike.
Its abundance around wooded parts of Queensland makes it an important bush tucker plant, but strangely one that remains relatively underused by gardeners. This superfood is a natural alternative to commercial turmeric, which has been over-cultivated for centuries.
The native version is easier to grow, packed with more flavour, and has more dramatic flowers than its more famous cousin. Give Curcuma australasica a go this year, whether it's to add colour to a shady spot, or to add flavour to a productive veggies garden.
Published on March 21, 2024 by Lorri Hopkins
Last Updated on March 25, 2024

