Compost, whether you’ve made it yourself or bought it, has countless benefits for your garden and with these simple DIY compost bin ideas, you can make your own in as little as three weeks.
I’m a passionate advocate of homemade compost. It’s cheaper, and genuinely better for your garden. It recirculates positive bacteria and rejuvenates soil with everything your plants have taken out. But, knowing where to start can be tricky.
So, depending on how you plan to use your compost, the sort of plants you’re growing, and the time you can commit, we’ve pulled together some of the most effective DIY compost bins you can make – some with materials you probably already have lying around, and some that don’t need anything other than space!
More...
20 DIY Compost Bin Ideas to Choose From
There are so many wonderful ways to create compost at home, but the principles of composting remain the same, regardless of the system you use, or the materials you use to build it:
- Smaller materials rot down faster (cut up large leaves and stalks)
- Compost works better when it is in contact with the soil beneath
- Avoid shaded positions. Compost bins in full sun are always more efficient.
- Use a mix of brown and green materials to get the perfect consistency.
- Never add fatty, starchy or protein-rich foods (e.g. egg shells good, eggs bad: raw vegetables good; fried vegetables bad)
- Leave compost open to the elements. Rain will speed things up.
- Bigger is not better with compost bins. Compost piles should never be more than 1.5m, across, or deep. This caused anaerobic decomposition in the centre, which is ‘rotten’, rather than ‘rotting’ and stinks.
The first two bins below are the easiest structural DIY compost bins to make, and I’ve used them to offer advice on two of the main compost systems (single bin vs three bin). After that, we’ll look at how to build compost bins using different materials, and the breathability they offer, as well as some more attractive choices.
1. Pallet Compost Bin
Source: The Owner Builder Network
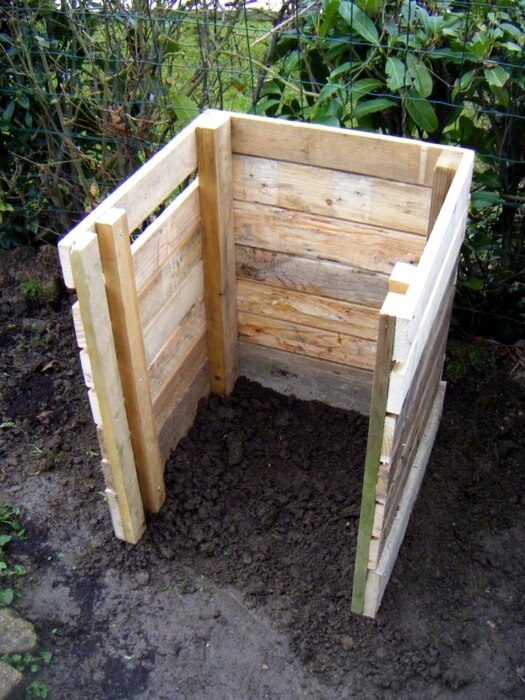
Pallet compost bins are by far the easiest way to quickly throw together a new compost system at home. They’re quick to build and can look pretty wonderful too, but most importantly, they offer your compost breathing space.
The most basic pallet compost bin is incredibly simple; just strap together three pallets, with the flat side facing in (otherwise, the base of a pallet will get in the way when you’re digging through compost).
Place your pallets on level ground, with open soil underneath to allow worms and any soil life to crawl up into the compost. This is essential to get decomposition moving and to add the necessary heat for even composting.
Pros:
- It’s cheap (pallets are usually available for free)
- It’s simple
- It offers generous amounts of space
Cons:
- Pallets are often made from untreated, cheap timber, and can rot down
- Without a few aesthetic amendments, they will always look like pallets
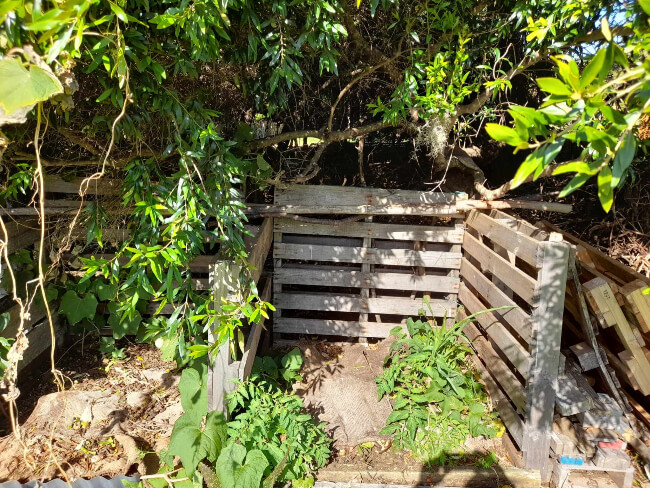
2. Three Pallet Compost Bin
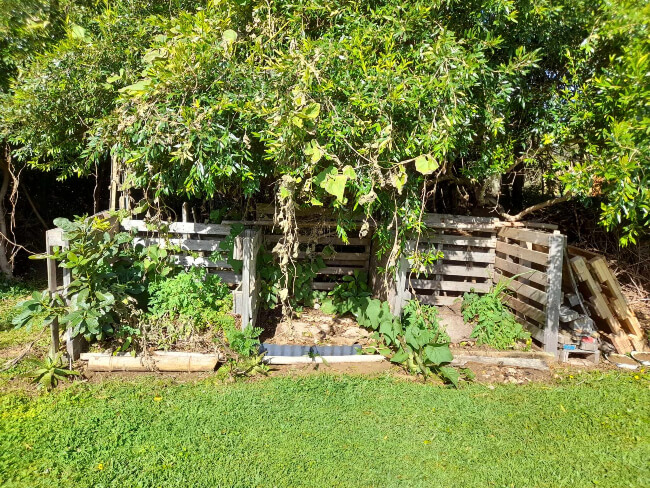
If you want to beef up your compost system, use the basic method above and extend it. Not only does this add more space, but it allows you to speed up composting, and build order into your compost system.
The basic principle of composting is that soil life does the hard work for you, but you can actually speed things up by turning regularly. In the first bin, add everything you’ve cut back from the garden in spring, and all the fallen leaves, mix them together, and let worms do their work.


Get Your Free Guide:
Master Growing Australian Natives eBook
A Must Have Complete Guide for Every Australian Garden
Get Your Free Guide:
Master Growing Australian Natives eBook
A Must Have Complete Guide for Every Australian Garden
In early summer, when your grass is providing plenty of green material, add the first few batches in and turn it all into the second bin. Then start using the first bin for new cuttings, leaf gatherings, and everything from the kitchen until late autumn.
Turn both bins to the right (or left… it doesn’t matter) and use the third for fallen leaves. Over winter, the original compost pile will rot down beautifully into usable compost. The second bin can then be turned into the final bin for use throughout the year and the leaves from autumn and winter make a beautiful, soil improving, mulch.
Repeat this every year and you’ll never be without compost.
Pros:
- Incredibly simple to build
- Completely organic compost
- Offer the option for leaf mould within the cycle
- The basic three-bin system can be made from any materials
Cons:
- As will all pallet compost bins, it will need cladding or planting into outer pockets to disguise the pallets
- Pallets will eventually rot
3. Brick Compost Bin
Source: Rob's plants
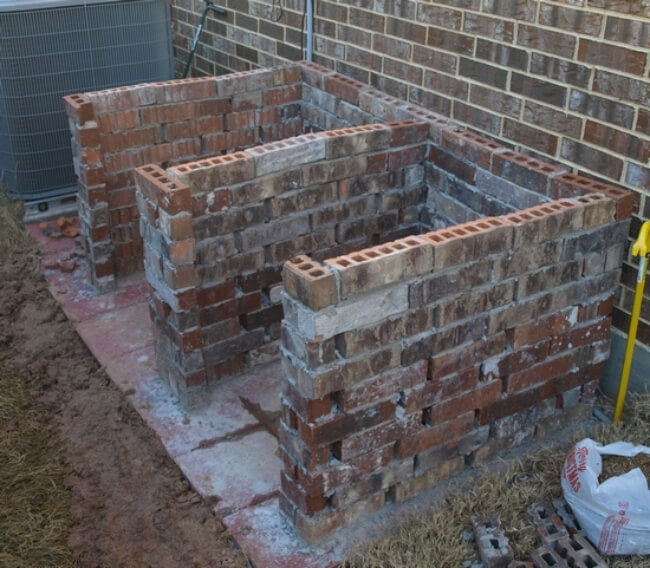
My grandads both had brick compost bins, so I’m quite attached to their aesthetics and built my own a few years ago. It’s probably the proudest piece of my garden (admittedly, visitors tend not to get that excited about it).
The principles here are both of design and practicality. Provided there are gaps in the bricks, you can get identical effects to wire and slatted compost bins by using any type of brick, and they will last forever with no chance of rot or rust.
Whether it's besser blocks or traditional clay bricks, mortar them in rows, but leave gaps between each brick on every row so you get air flow (California blocks work well for this too). Build a three-sided compost bin, and extend it to three bins if you have room, adding a retaining door either with mesh, or timber slats.
Pros:
- Brick compost bins will last a lifetime
- They retain heat in your compost and extend composting well into winter
- They’re cheap and can be made from salvaged materials
- You can be creative with your designs
Cons:
- Brick compost bins are more time-consuming to construct
- You’ll need to buy mortar
4. Barrel Compost Bin
Source: Art and Home
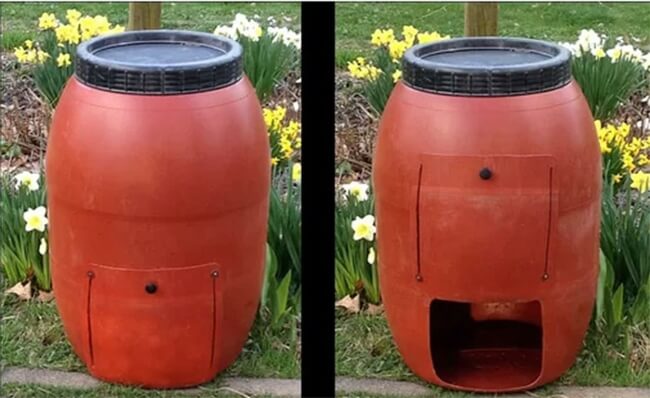
We’ve all seen the ‘Tardis’ compost bins. With conical plastic bodies, round lids, and a small door at their base. They cost much more than they should and are really easy to make from upcycled plastic barrels. As long as you’ve got air holes, and a basic saw you can make your own in minutes.
These bins are usually black to heat up your food and garden waste and produce quicker results, and they work pretty well, but with a few basic hacks, you can make something much more effective for free.
Get an old plastic barrel (the bigger the better) and drill holes all over the body (about 20 cm apart). Drill a small hole at the top of the barrel and use that to start sawing off the lid (unless it’s got a releasable lid, which is even better).
Cut the entire base off the bottom of the barrel and discard it, then cut out a door at the bottom of the barrel.
Make a basic set of hinges with cable ties for the lid and the door, and that’s it. Just pop it in a warm corner of the garden and fill it up as you go. The stuff at the bottom will rot down and be accessible from the door, while everything higher up falls as you use the old stuff.
Pros:
- Free to make
- Speeds up single-bin composting by about 10%
- Great project for gardeners with kids
Cons:
- Single-bin systems are slower than three-bin systems
- Limited space
5. DIY Compost Tumbler
Source: Instructables
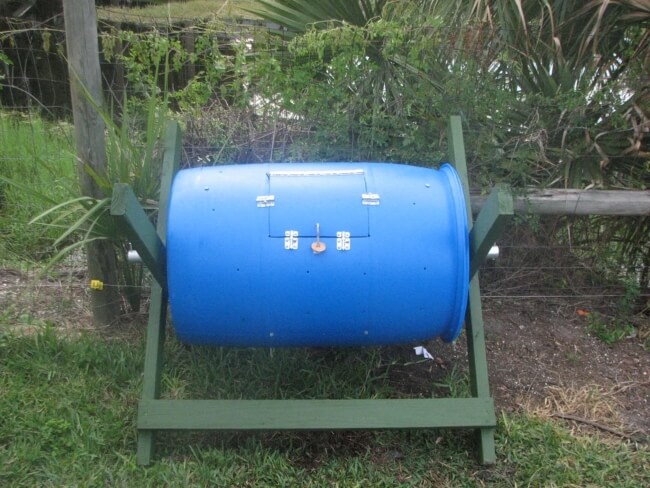
If you’ve got space, and a bit more time on your hands, you can make even more of that old barrel from the DIY compost bin above. Compost tumblers can be super expensive to buy, but they’re basically just a barrel on a stand – and in reality, you don’t actually need the stand…
Cut a door out of an old plastic barrel, secure it back in place with hinges, and add a reasonably good latch to keep the door shut. Then drill a few aeration holes around the body of the barrel, and that’s it; a rolling compost barrel.
Place it on its side and roll it around the garden to tumble your own compost and get compost in as little as a month with daily turning and regular wetting. If you want to go a bit further, you can cut out holes on either end and add an axle that goes through the centre of the barrel. A simple support for the axle will allow you to tumble your compost in one spot.
Pros:
- Great way to make compost quickly
- Budget-friendly (possibly free if you’ve got hinges lying around)
Cons:
- Needs regular turning, and worms added in
- Needs watering occasionally to retain moisture and speed up the system
6. DIY Wormery
Source: Natural History Museum
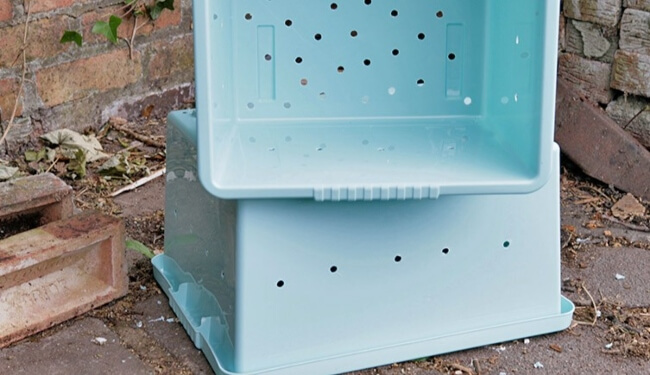
A wormery, worm composter, or, if we’re being really fancy, a vermicomposter, is all about layering. You can make DIY wormeries pretty easily, and they’re particularly useful for balcony gardens, or gardens with limited space, especially if most of your compost is kitchen waste rather than garden waste.
Worm castings are just worm poop, but they’re essentially what all loamy garden soil is made from – fallen leaves, digested by insects, and fed back to plants. Vermiculture just speeds things up a bit.
You’ll need a few plastic boxes, a drill, some newspaper and plenty of kitchen waste. Oh, and some worms!
Stack plastic boxes on top of each other, with plenty of holes drilled, or the base cut out and replaced with a grid. Layer newspaper between each box, and then add your kitchen waste, grass clippings, newspaper, etc.
Add waste in layers and always start with a handful of garden soil to offer bedding. Start from the bottom box, and work up to the top, rotating boxes as they’re composted (usually takes 6-8 weeks).
Pros:
- Quick compost
- Great fun
- Potential upcycling project
Cons:
- You’ll need to buy the right worms
- Regular maintenance needed
7. DIY Wormery with Tap
Source: Working Worms
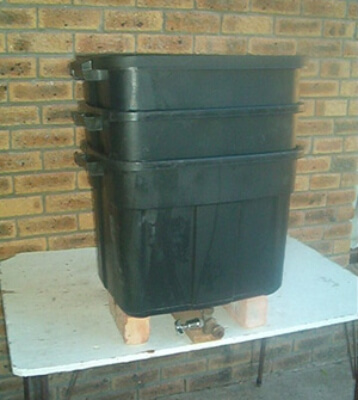
If you start with the same method as above, there’s a brilliant hack to get even more from your worm composting bin; tapping off fertiliser.
A basic water butt tap, fitted to the bottom layer of your worm composting bin will provide liquid fertiliser that you can use on houseplants and garden plants alike. It’s a mix of digested waste and nutrient-rich moisture released from vegetable peelings, and it’s a great quick-release feed for any plants that need a speedy nitrogen boost.
There’s no difference in the initial set-up, but that bottom bin needs to stay on the bottom, and the tap should be fitted right at the base so every last drop can be poured out when needed.
Pros:
- Easy to build
- A quick way to produce DIY fertilisers
Cons:
- Limited space for composting
- Requires regular upkeep
8. Standard Compost Pile
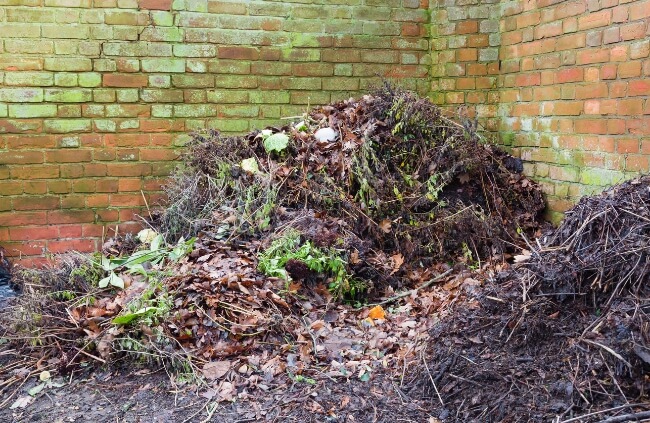
While keeping your compost tidy is a good way to maintain a routine, and manage your composting more precisely, it’s not strictly necessary. Any old pile of garden waste, provided it’s turned regularly, and made from a mix of brown and green waste will do just fine.
It’s one of the slowest ways to produce compost, but it’s effective, and it’s incredibly easy. You won’t need any materials, or time, just space.
If you want to improve this system slightly, dig over the earth before adding garden cuttings and leaves to the pile, just to help open up drainage, and prevent compaction beneath your compost pile.
Pros:
- It’s free
- It’s easy
- Compost piles have been used for millennia to produce effective and usable compost
Cons:
- It’s untidy
- It’s slow
- It’s easy to overload and cause anaerobic decomposition in the centre of a pile
9. Berkeley Compost Pile (14-day compost)
Source: Gardens That Matter
Now, if you’re willing to put the time in, ignore my reservations about compost piles from the last DIY compost idea, because there are some real potential benefits to a simple system.
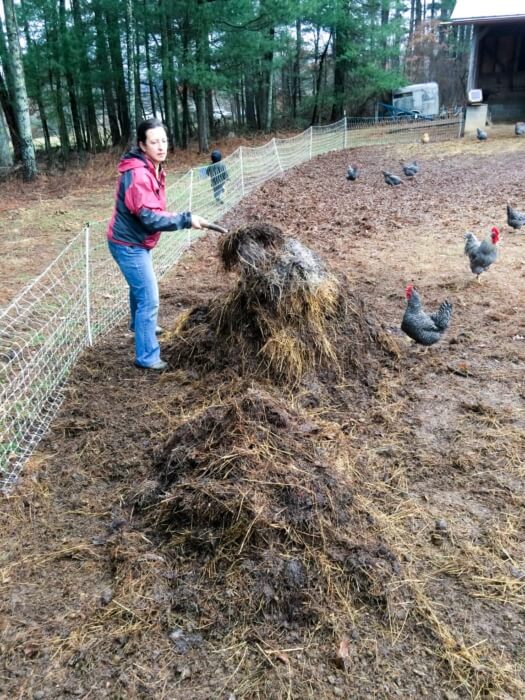
What is generally called the Berkeley compost system, is a very, very simple method of turning daily to produce faster results, and it works to produce compost in about 18-20 days. And not just mulching compost, but usable, growable compost.
We tried it last year and it really does work – try adding chicken manure or rabbit poop to the mix for better results and aeration too.
To make your own Berkley compost pile, chop up everything you plan on compositing to the smallest possible size (The easiest way to do this is to go over your garden waste with a lawn mower). Then pile it up to about 1m tall and 1m wide.
Wet the pile really thoroughly, and leave it for 2-3 days to settle. On the third day, turn the entire pile over, and repeat this every day until you’ve got compost of a grade you’re happy with.
Pros:
- Absolutely free
- No tools or materials are required at all
- Incredibly quick composting
Cons:
- Hard work
10. Simple Wire Compost Bin
Source: Ideas2Live4
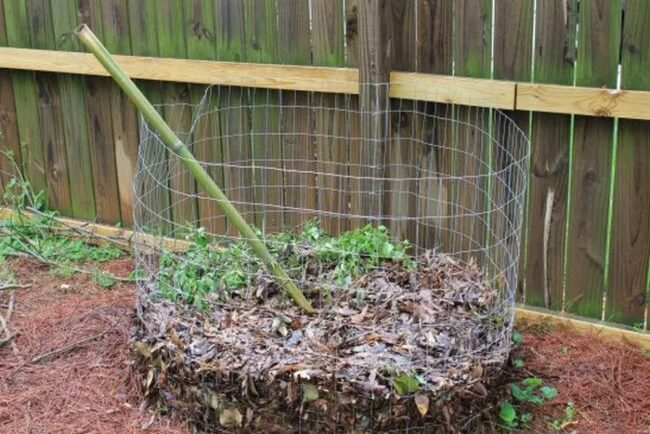
Four fence posts and a roll of chicken wire are all you need to make a really simple compost bin. Just drive your fence posts into the ground (cement them if you want a more permanent structure) and staple chicken wire to the outside.
If the posts aren’t concreted in place, add some retaining timbers across the top to stop the pile from bowing outwards when full. Fill it up, ideally in layers of brown and green waste, and the chicken wire provides ultimate aeration from your compost and even lets you see how it’s getting on.
Pros:
- Cheap to build
- Easy to build
- Very well-aerated compost
Cons:
- Mice and other small rodents can get at your compost
- Chicken wire will eventually rust
- Chicken wire can catch on garden forks when turning, so be careful
11. Triple Wire Compost Bins
Source: True Value
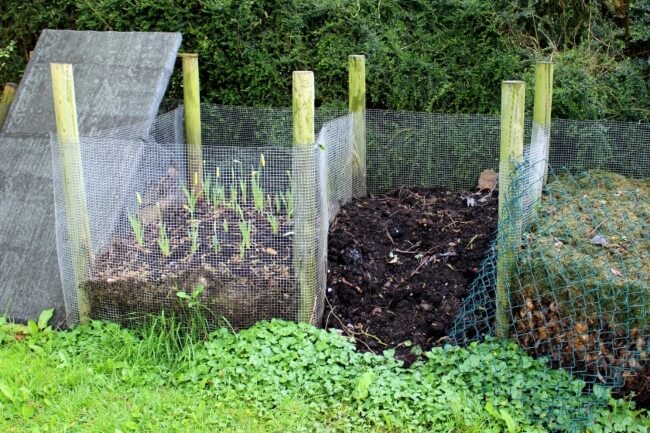
Similar to the pallet compost bins above, you can repeat this same process with chicken wire, by creating a simple grid of fence posts, and stapling chicken wire along the back, and forward-facing sides.
Leave the front open, or pull a roll of chicken wire across the front for a neater finish (either do this for each section or one removable panel for the whole front section so you can still get at the compost).
While this might not be the most attractive DIY compost bin in the world, it’s actually one of the most effective.
As you move one section of compost into the next bin, the chicken wire allows worms to move between bins, speeding up the newest pile’s decomposition hugely. And any worries about aeration are completely alleviated by the fact the walls are entirely breathable.
Pros:
- Chicken wire is cheap to buy
- You can adapt the shape to fit any space in the garden
- Well aerated compost
- Easy to build
Cons:
- Chicken wire can rust
- Garden forks tend to snag when turning compost over
12. Simple Compost Bin with Slatted Door
Source: Good Housekeeping
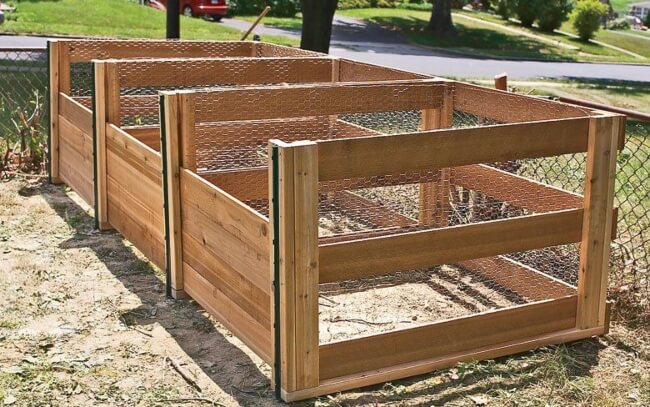
Any DIY compost frame, whether it's pallets, fence posts, or bricks, will benefit from a door. The most space-efficient type of door for any compost bin is a slatted door, with planks that lift out.
It’s easy to do and offers more control of your composting space. You’ll need two pieces of wood, one slightly narrower than the other, for each side of the slat frame. Screw the narrower section of timber to the upright of the front of your compost bin, and then attach the wider piece to the front of that.
This should give you a simple channel. Then all you need to do is slide in planks that fit in the groove. When you need to access your compost, either for use, or for turning, just slide out as many panels as you need, and put them back in place when you’re done.
For the most effective slatted compost bins, add chocks between each salt so air can still circulate between each slat.
Pros:
- Can be worked into any existing compost bin arrangement
- Easy to construct
- Long-lasting
- Keeps compost tidy
Cons:
- Can limit aeration
13. Compost Bin with Hinged Doors
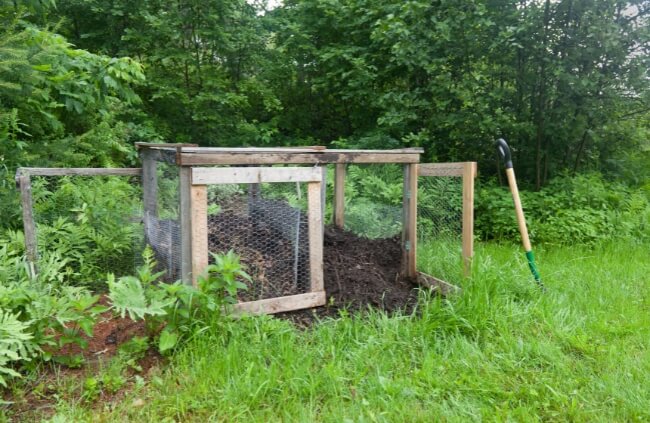
As with slatted doors, adding a hinged door to your DIY compost bin will just help to keep things tidy. The materials you use are up to you, but personally, I like to use chicken wire on a timber frame.
It’s cheap and easy to construct, and lasts for years, offering optimum aeration, and visual access to your compost so you can keep track of how it’s getting on without opening the bin completely.
You’ll need the appropriate hinges and screws to fit your door onto whatever compost bin you have, but other than that you can pretty much make it up as you go. As long as the door opens well and closes securely, it will help to keep pests out of your bin, and compost in!
Pros:
- Simple to build
- Reasonably cheap materials needed
- Long-lasting
- Makes compost management really simple
Cons:
- Requires more space in front of your compost bin, so not ideal for smaller gardens
14. Insulated Compost Bin
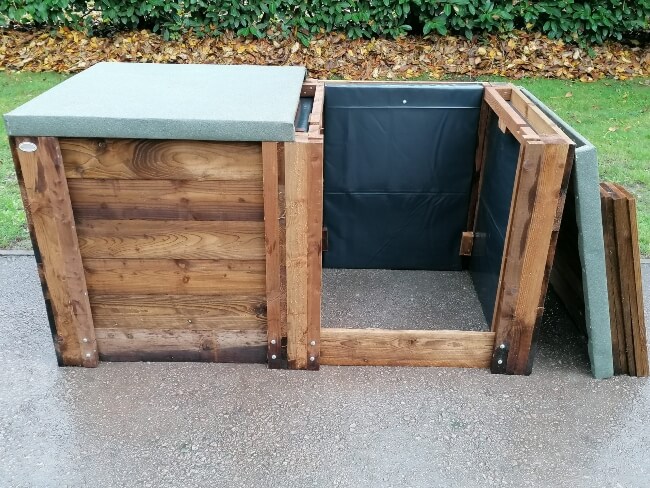
Source: Archwood Greenhouses
Insulated compost bins are getting more and more popular, but they do have limitations in addition to their benefits. We all know that warming compost is important, so, particularly in colder parts of the country, or gardens where trees limit afternoon light, insulated compost bins ensure that heat is held in for longer.
The downside of this is poorer aeration, so compost bins have to be smaller to make sure they don’t stagnate. The really big positive for these compost bins is that they can look really, really beautiful.
Literally, just by adding foam insulation to the outside of a timber compost bin you can get playful with render and cladding and make a beautiful feature of your DIY compost bin.
If you’re willing to water your compost regularly too, you can boost this further by adding a glass top to intensify the sun’s heat when it’s available.
Pros:
- Can produce very attractive compost bins
- Retains heat in winter and on cold evenings
Cons:
- More expensive
- Limits composting space
15. In-ground Compost Pile
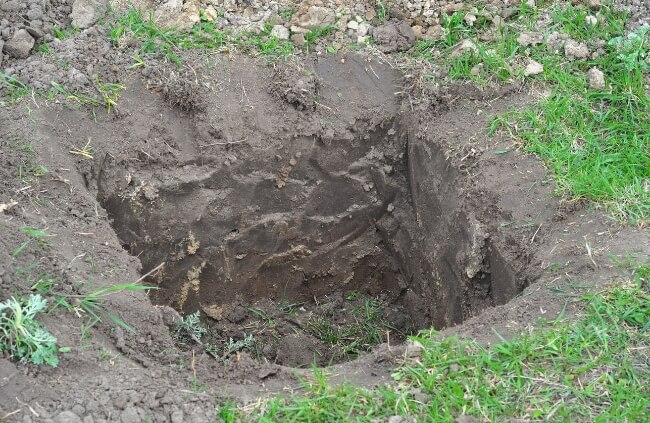
One of the simplest ways to create a compost pile, and potentially least intrusive in the garden in a compost hole, or compost pit. Effectively, what you’re doing with this method is putting your kitchen and garden waste exactly where the worms want it, as well as boosting humidity and retaining moisture around your compost while it decomposes.
Any pit that’s about 1.5m wide and long will offer ample space, and make sure the base of the pit doesn’t get too stagnant (though the base will generally be fine regardless of depth as worms tend to work fastest down there).
Keep the depth manageable so you can dig it over when needed, and that’s it – another completely free DIY compost bin idea!
Pros:
- Completely free
- Virtually invisible
- Fast-acting compost that you can forget about until you need it
Cons:
- Back-breaking work if you need to turn your compost!
16. Compost Trenching
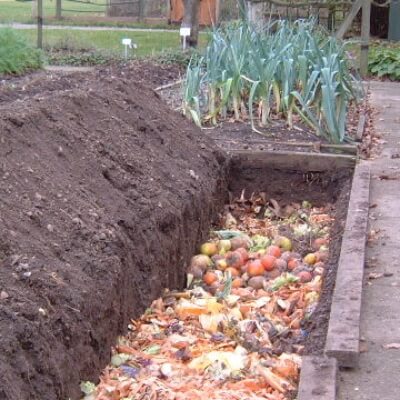
Source: Peterborough Master Gardeners
Compost trenching is different from compost pits in that you don’t actually need to wait at all to use your kitchen waste. Some plants, particularly legumes (beans), are so hungry that adding kitchen waste, straw, pet bedding (anything really) to the base of planting holes will rapidly accelerate growth in spring.
There’s no need to compost anything in advance, just save a bucket of kitchen waste or grass clippings and add the whole thing to a double-depth trench. Cover it lightly with soil, and then sow your beans directly as you would normally.
Pros:
- Instantly uses kitchen and garden waste
- Completely free
- Makes sure no nutrients are wasted
- Warms soil in early spring
Cons:
- Won’t work with all plants
- Can attract pests
17. DIY Compost Bin, with a Bin
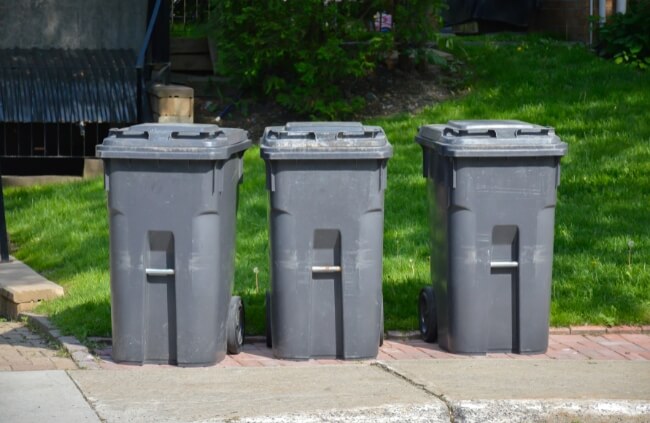
I’ve always thought that ‘compost bin’ was a pretty unfair term. OK, so it’s where we chuck our waste, but it’s far from a disposal system. It’s a machine that turns waste into an invaluable garden resource.
But… you can actually use an old bin to make your own DIY compost bin. Whether it’s a wheelie bin, or an old galvanised tin bin, as long as you add holes to the sides and base so worms can enter and exit, they make a well-insulated vessel for composting that can be moved around easily.
Use bins of wheels for simple movement, or cylinder bins with sealable lids for the option of easy composting turning.
Pros:
- Great upcycling project
- Durable compost bin vessel
- Many options for different styles
Cons:
- Quite slow compost production
18. Straw Bale Compost Bin
Source: The Sharing Gardens
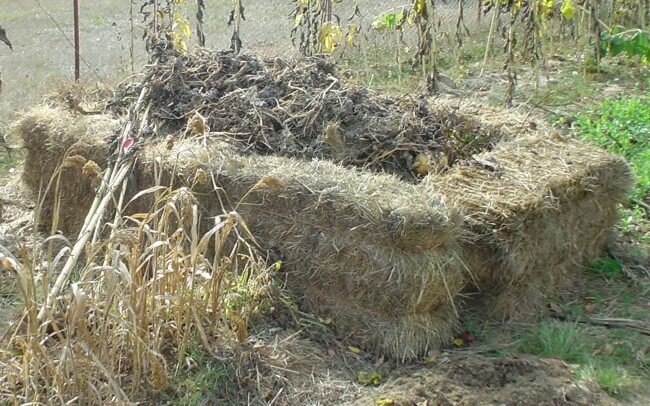
Straw bale compost bins are ok. That’s about as far as my praise for them can go, because, while they are natural materials, and they look beautiful, they last far longer than you think, and are incredibly dense, offering little to no aeration for your compost.
They retain water, which can stagnate around the sides of your compost, and even offer homes for rodents to nest. Basically, I’m not a big fan of straw bale compost bins.
However, if you’ve got straw bales, and need to use them, they do make reasonable walls for a compost bin. The trick is to limit the size of the bin. Try to keep your compost bin to about 50cm wide, and turn it regularly to encourage even composting.
Pros:
- Organic, and will eventually compost themselves
Cons:
- Regular maintenance and tuning
- Limited space
- Potential for anaerobic decomposition
- Minimal aeration
19. Hot Composting
Source: Instructables
Hot composting is a method that entirely focusses on heat. Encouraging faster decomposition, but not necessarily the best quality compost. The downside is potentially stagnant moisture, but the positives do generally outweigh that one negative.
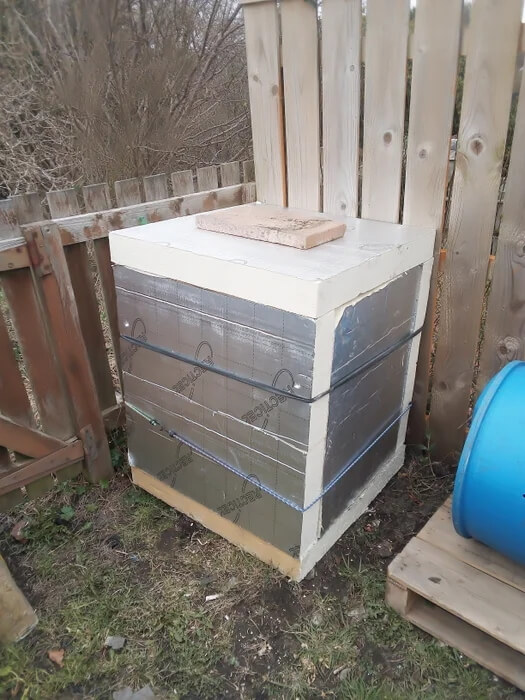
By hot composting, you can compost most things you wouldn’t ordinarily add to a traditional compost bin, like eggs and limited fatty or cooked foods. All you need is a few sheets of foam insulation (like Kingspan), which are strapped or screwed together into a cube (including a base).
The insulation is largely weatherproof so doesn’t need any cladding other than for decoration, so you just fill it, bit by bit, with garden and kitchen waste, and it’s heated by the sun to rot down.
There’s no need to add worms, and no need to aerate it. Within about three months the first layer should be rotted and can be accessed from the base without turning.
Note: There are some blogs out there advocating for human poop compost, but given that we’re mostly omnivores, our personal waste really should be avoided in the garden, even if it’s just for the simple fact we produce a LOT of ammonia, which is bad for most plants in excess.
Pros:
- Very quick to build
- Speedy, low-maintenance compost
Cons:
- Fairly expensive materials
- Completely anaerobic decomposition
- Hard to keep track of the composting stages
20. Bokashi Composting
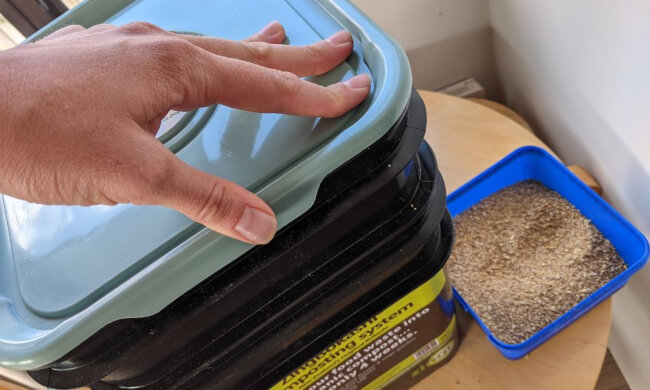
Bokashi isn’t strictly compost. It’s fermented waste. However, it can be used in a pretty similar way, and the liquid feed it produces is (despite many of my own reservations at the outset) very effective at feeding foliage plants.
All you need is two clean buckets, a drill, and a tap (the plastic sort with rubber seals). Drill the base of one bucket full of holes, and at the bottom of the other bucket, fit the tap. Add a few waterproof spacers to the base of the first bucket, and place the one with holes inside.
Fill it with kitchen waste, and add a few spoonfuls of ‘bokashi inoculant’ and then stick the lid on. Wait a few weeks and the anaerobic fermentation will rot down the solid materials into usable compost or mulch, and the liquid in the bottom bucket can be used as a diluted fertiliser when watering houseplants.
You can make your own ‘bokashi bran’ or ‘bokashi inoculator’ but it’s a long process that requires curdled milk, white mould, molasses and bran flakes (amongst other ingredients) so if you’re just trying bokashi compost out, buy a bag of pre-made inoculant first.
Pros:
- A quick way to make DIY fertiliser
- Reasonably good quality mulching compost
- Simple to build
Cons:
- You’ll need to buy materials regularly
DIY Compost Bins Frequently Asked Questions
What can I put in my homemade compost bin?
You can put any raw vegetable waste from the kitchen, along with eggshells, old fruit and off veggies into your compost bin, but mix that with green and brown waste from the garden. In summer, add torn-up newspaper or cardboard to your compost bin to activate the green waste.
What should you not put in a compost bin?
Things you should not put in a compost bin include fatty foods, bones, cooked foods (other than boiled veggies), grease, eggs, meat, fish or dairy products. Partly this is because they decompose slower than other waste, but it is mainly because they will attract pests and rodents.
How often do you have to turn compost?
Compost will eventually decompose even if it is never turned, but you can achieve faster, more even results with regular compost turning. Turning compost every two weeks is more than adequate for typical decomposition, but turning every 1-2 days can produce rapid results and help to maintain higher temperatures in your DIY compost pile.
Can you put mouldy food in compost?
You can put mouldy food in compost. Stick to veggies, not meat or dairy, as with any compost ingredient list. The mould on vegetables will actually help to boost the speed of composting and add beneficial bacteria into the mix.
Can Mouldy Bread go in compost?
Mouldy bread, fresh bread, or any baked goods should not be added to compost. Unless that bread is simple homemade bread without any enrichment (flour, yeast, water, salt) it should not go anywhere near your compost. Enriched dough and baked goods, whether fresh or mouldy, are bad for compost.
What happens if you don’t turn your compost?
If you don’t turn your compost, it will decompose slower, but it will still work. Turning compost is a choice, and one that has many benefits, but it isn’t strictly necessary as long as you’re not in a rush.
Can you compost paper towels?
Paper towels, newspaper, tissues and any cardboard are all great candidates for composting. They add simple carbon and help to balance moisture levels in compost, even providing bedding space for worms.
Don’t have the time to make your own compost bin? Check out our reviews of kitchen compost bins and outdoor compost bins to see which would best suit your composting needs.
Wrapping Up Our DIY Compost Bins Guide
DIY compost bins are one thing that every gardener should have. Spending a fortune on compost bins isn’t a waste of money, but considering the minimal difference, and the magic that can be achieved with DIY compost bins, everyone’s first choice should always be DIY composting.
With so many styles to choose from and a proper understanding of what makes each type of DIY compost bin different from the next, you should be on your way to a self-sustaining garden in no time!
Published on October 28, 2023 by Gary Clarke
Last Updated on September 20, 2024


